Introducing My Tried-and-True Photography Tips and Techniques
Lately, with this beautiful weather, I’ve been truly running out of time to sort through my endless pile of photos. Interesting scenes accumulate through my camera lens that I want to share with you. But there’s simply not enough time to organize them. I love to wander around too much 🙈. I enjoy the world around me, and in doing so, I quickly forget about the tasks awaiting me at home 😀.
So this time, I quickly browsed through my archive and found a few photos. And while reviewing these photos, I remembered a few photography tips and techniques that I love to use. Techniques that help me capture a moment, a feeling, or a story in the way I want to express. Tips that can help you develop your unique photographic style and express your creative visions.
I decided to introduce a few of them to you. I hope they will help you capture your special moments and share them with the world, just like I share mine 📸.
To me, photography is an art that involves much more than just pressing the shutter. It’s a world full of interesting stories and adventures 💥. It starts with understanding light, as it is the key element of every photograph. Natural light can create magical effects and dramatically change the look and feel of a photo.
But regardless of all that, don’t forget that the most important element of any photograph is not the technique or the equipment, but the joy you experience while creating. So don’t be afraid to make a mistake. Travel, experiment, play, and let every photo be a reflection of your experiences. Let your world be full of colors, light, and love for photography.
Are you ready?
Photography Tips and Techniques
1. Macro Photography
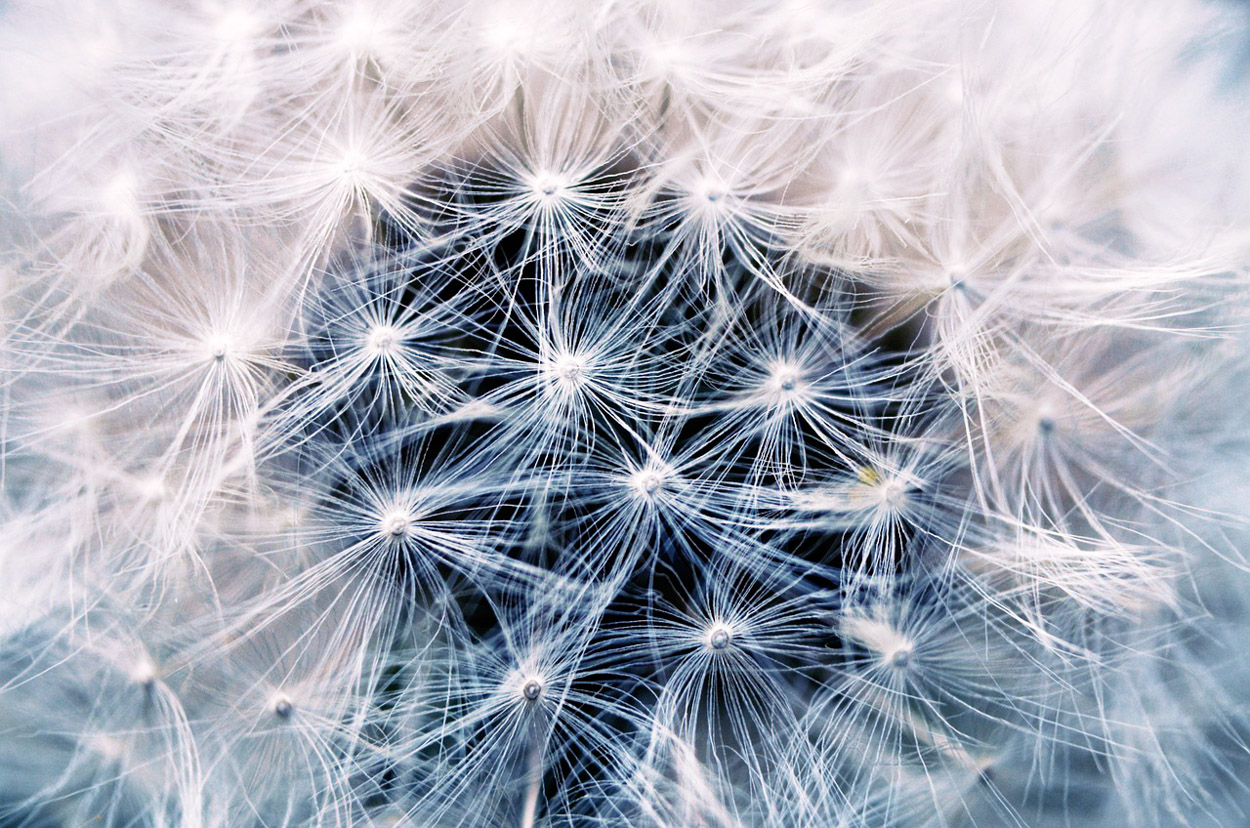
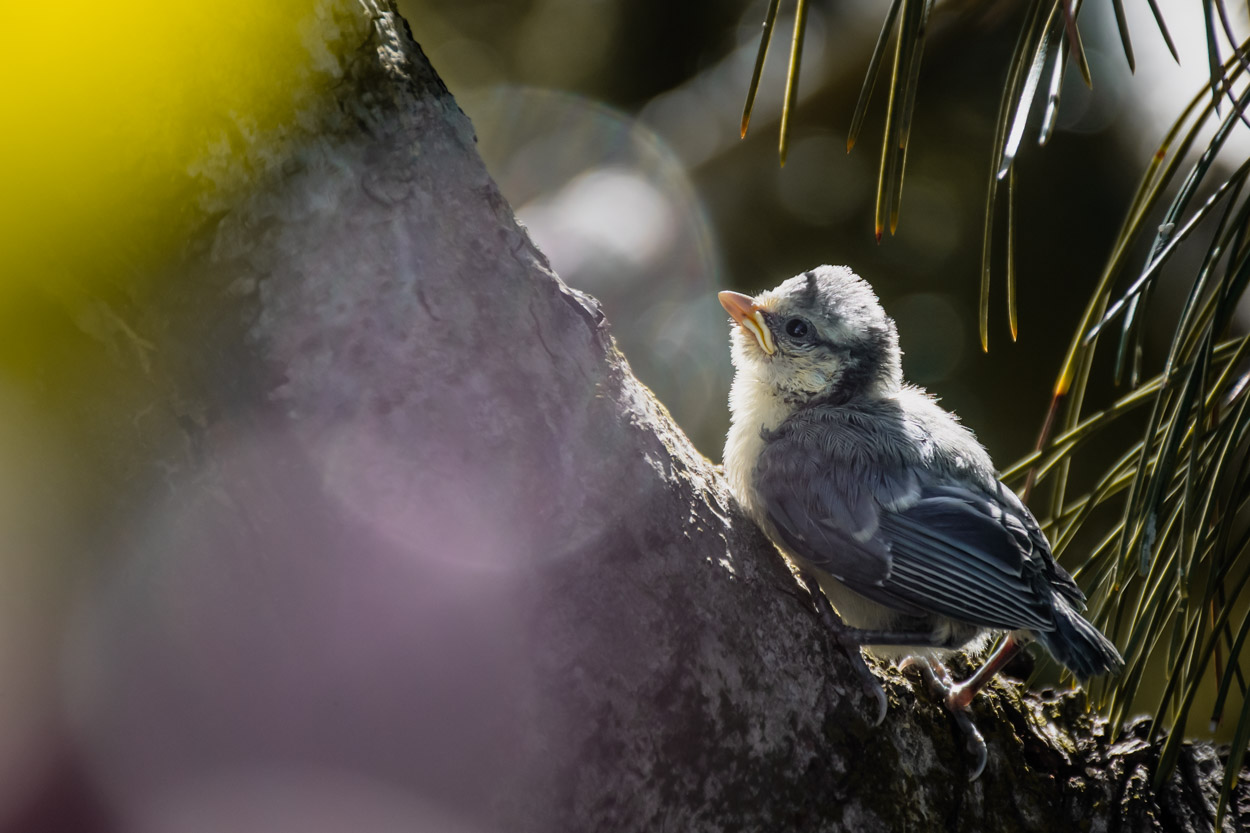
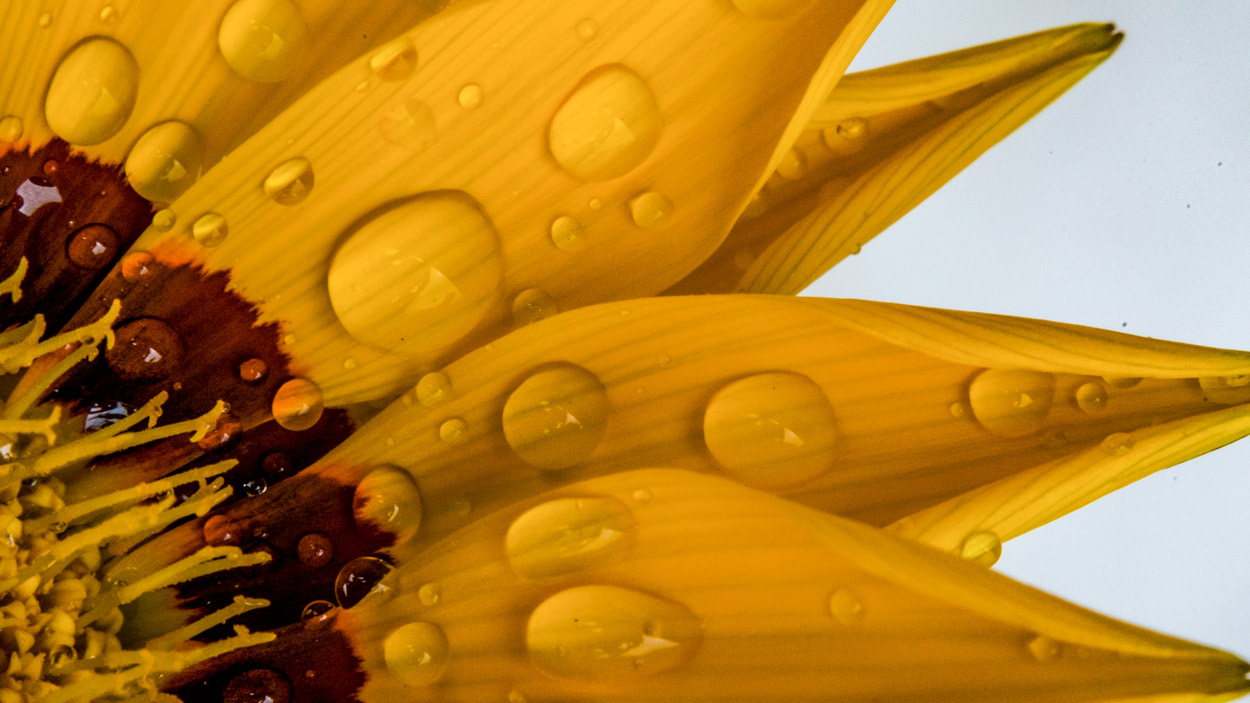
Macro photography is a type of photography that allows for extremely close-ups and focuses on small subjects such as insects, flowers, or water droplets. One approach to achieving this type of photography is by using macro rings or extenders.
Macro rings, also known as extension tubes, are designed to increase the distance between the lens and the camera sensor, allowing for closer focusing and greater magnification of the subject.
To take photos using macro rings, follow these steps:
Choose the right lens
As a rule of thumb, for macro photography, it’s better to use a telephoto lens, such as a fixed focal length lens of 50mm or 85mm.
Attach the rings
Attach the rings between the lens and the camera body. You can use one or more rings at the same time, depending on how much you want to magnify the subject. The more rings you add, the closer you’ll be able to focus.
Set focusing mode to manual
Due to the shallow depth of field in macro photography, it’s often best to use manual focusing. This allows more precise control of the point of sharpness.
Stabilize the camera
Macro photography requires a lot of stability, as even the slightest movement can cause the photo to be blurry. The use of a tripod or other stabilizing equipment is highly recommended.
Experiment:
Macro photography allows for a lot of creativity. Experiment with different subjects, different depths of field, and different heights of the lens.
Macro rings are incredibly useful tools that allow you to create impressive macro photos without the need for expensive, specialized lenses. With a little practice, you’ll be able to reveal the wonderful details in the small world around you using macro rings.
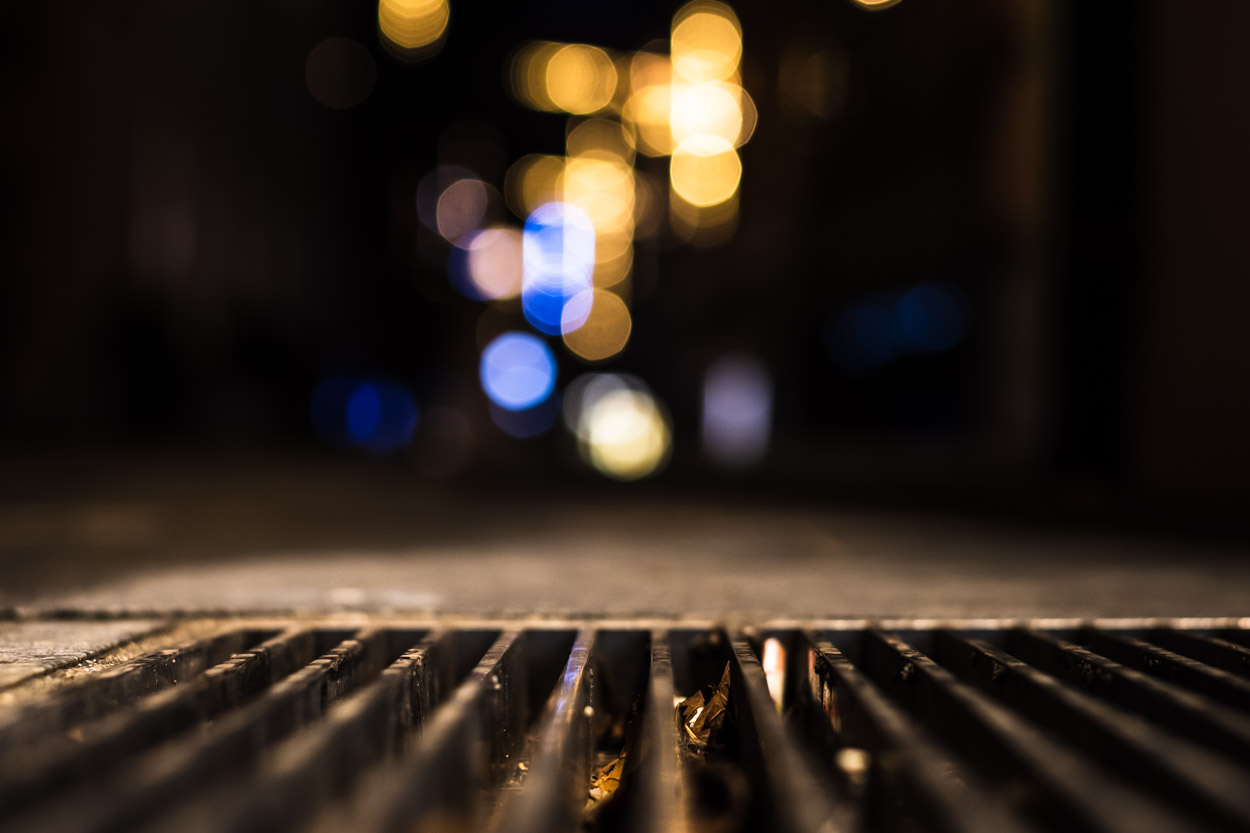
– The difference between macro and close-up photography
Macro photography and close-up photography are two techniques that may seem very similar at first glance, but each has its own special characteristics.
Macro photography is a technique that focuses on photographing small objects or small parts of objects with a lot of detail that may not be seen with the naked eye. In macro photography, a 1:1 ratio or greater is often used, meaning that the size of the object on the camera sensor is the same or larger than its actual size. Special macro lenses or accessories, such as macro rings, are often needed for this type of photography.
On the other hand, close-up photography, as the name implies, involves photographing an object up close without the need for a faithful 1:1 ratio. You could say that close-up photography is a kind of “lighter” version of macro photography, as it does not focus so much on detail and does not require special equipment. The aim of close-up photography is to highlight a certain part or characteristic of an object without capturing the entire object.
In both techniques, the concept of “depth of field” is important, as due to the proximity of the motif and the use of a large aperture, the depth of field becomes very narrow, which contributes to the isolation of the motif and the blurring of the background.
2. Bokeh
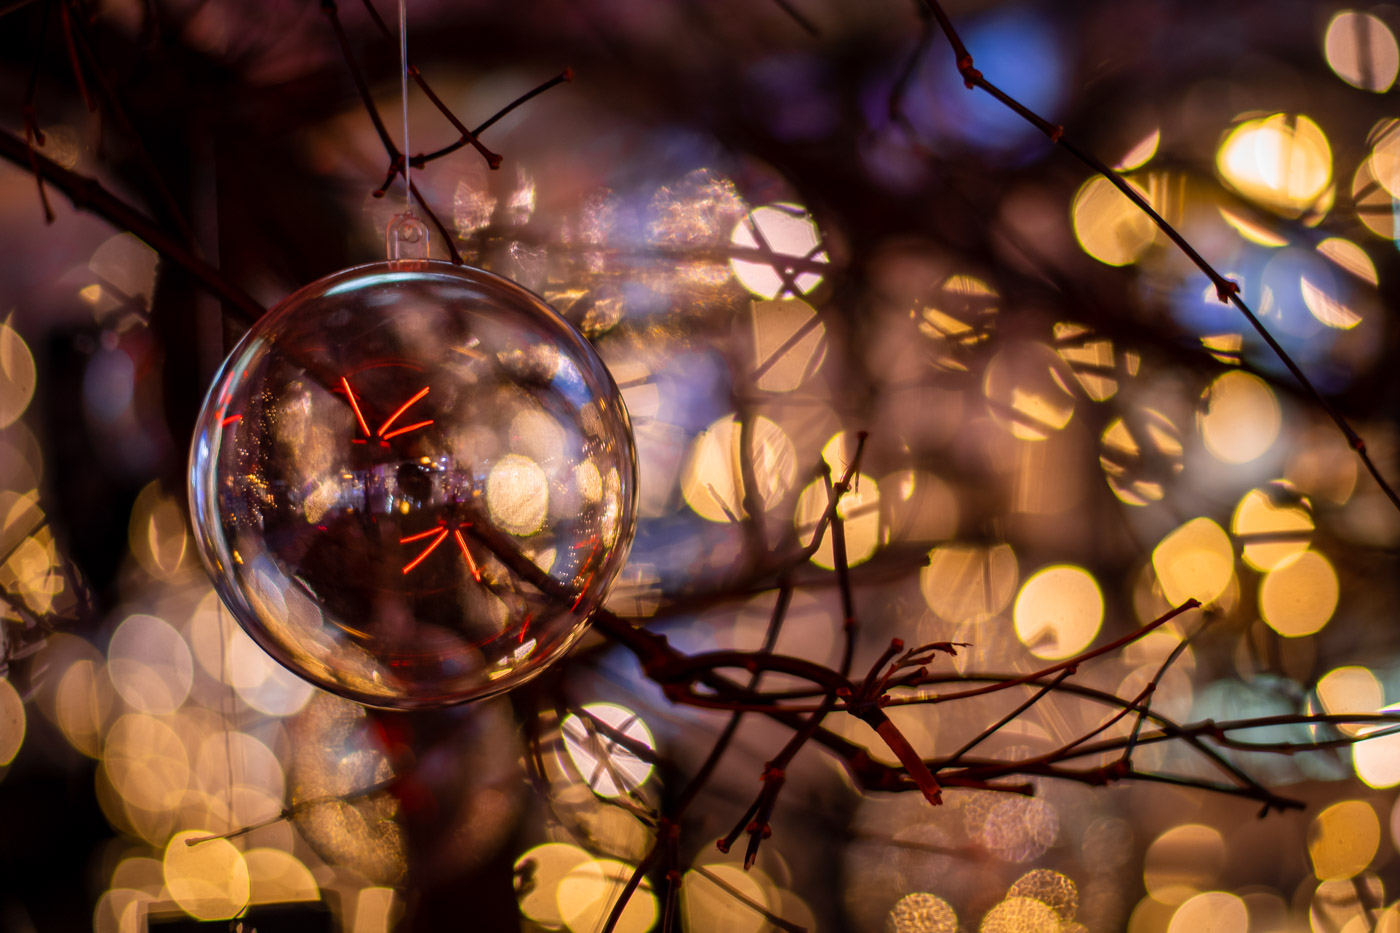
Bokeh is a term that comes from the Japanese word “boke,” which means “blur” or “haze.” This phrase refers to the aesthetics of a blurred background in photography and the quality of blur that results from using a shallow depth of field. This could include blurred lights, colors, or any background that is different from the sharp subject in the photograph. Here are some steps on how you can create a bokeh effect in your photos:
Choose the right lens
Lenses with a wide aperture (low f-number, for example, f/1.8 or f/1.4) are ideal for creating a bokeh effect as they allow more light in and have a shallower depth of field.
Camera settings
Set your camera to aperture priority mode (Av on Canon, A on Nikon, and Sony), which allows you to control the aperture, and the camera automatically adjusts the other settings.
Wide-open aperture
For a bokeh effect, set the aperture to the lowest possible number (widest opening). This reduces the depth of field and increases the blur in the background.
Subject distance
The subject should be as close to the camera as possible, while the background should be as far away as possible. This creates a greater contrast between the sharp subject and the blurred background.
Background
A background with varying colors and light sources will yield a more interesting and appealing bokeh.
Experiment
Experiment with different settings and backgrounds to see how the bokeh effects change. Also, play around with different light sources, such as fairy lights, natural light, and reflected light. Bokeh is a beautiful technique that you can use to add depth and highlight the subject in your photos. I love it. With a little practice and experimentation, you will be able to create stunning bokeh effects.
Feel free to visit my blog about photography of bubbles, where you can see the effects of bokeh.
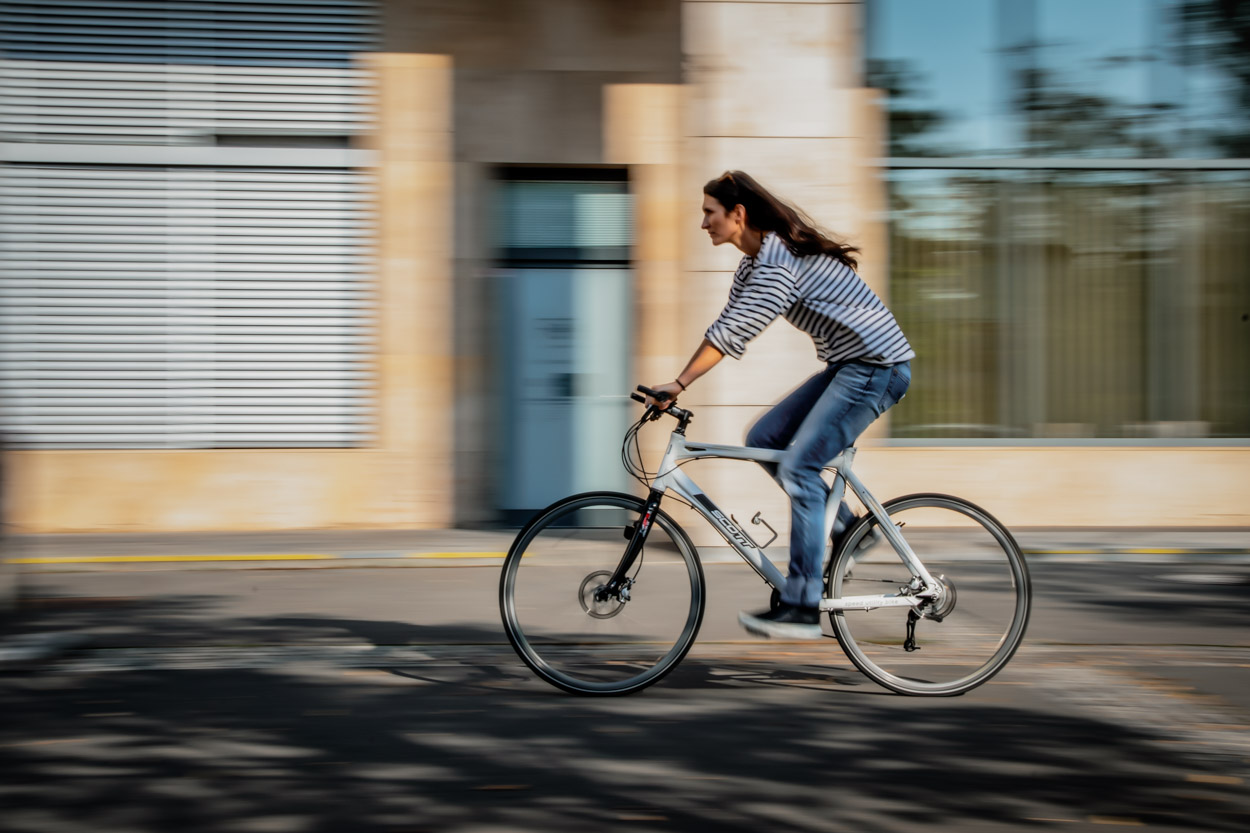
3. Panning
Panning is a photographic technique that photographers use to depict motion and speed. This technique involves tracking a moving subject with the camera during a long exposure, which creates blur in the background while the subject remains clear and in focus. Here are some steps to help you create effective panning photos:
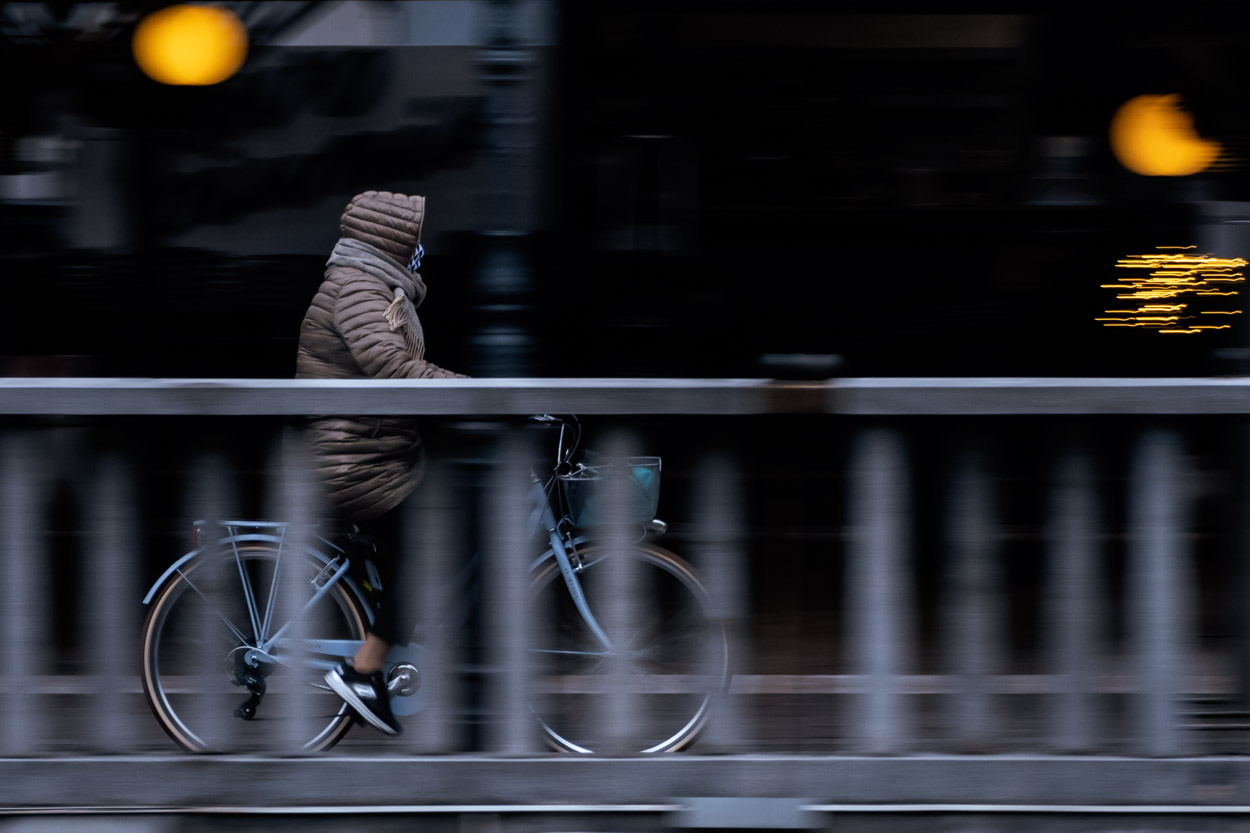
Choose the right location and subject
Panning works best with moving subjects such as cars, cyclists, runners, motorcyclists, etc. Choose a location where your subject is moving in a predictable direction.
Set your camera
Aperture priority mode (AV on Canon cameras, A on Nikon, Sony, and other brands) is a good start. Set the ISO to a low value (e.g., 100) and the aperture to a high value (e.g., f/8 or f/11) to increase the depth of field. This will help your subject remain sharp even if your tracking is not perfect.
Set the shutter speed
Ideally, start with a shutter speed between 1/30 and 1/60 second and then adjust based on the results. A longer shutter speed will create a more blurred background, but it will be harder to keep the subject sharp. It’s also important to maintain a uniform speed and direction of movement while tracking the subject and triggering the shutter.
Tracking the subject
Proper tracking of the subject is essential in panning. Do this by placing the camera at the point where you expect the subject to be and then smoothly following the subject’s movement with the camera. In other words, move along with the subject in the direction of its movement. In practice, this is often challenging as it requires a lot of practice and coordination between your movement and the subject’s movement. As a rule, you’ll need a few attempts before you get the desired result. I recommend burst shooting, as this gives you more chances of getting a successful shot.
Practice and experiment
Stand with the camera in your hand and relax your body. The camera should follow the movement of your torso as you turn to track the subject.
Panning requires some practice, so don’t get discouraged if your first shots don’t look perfect. Over time, you will develop a sense of motion and learn how to best track your subjects.
However, it is a very fun and dynamic technique that can really stand out in your photography. So go out, have fun, and create some amazing images!
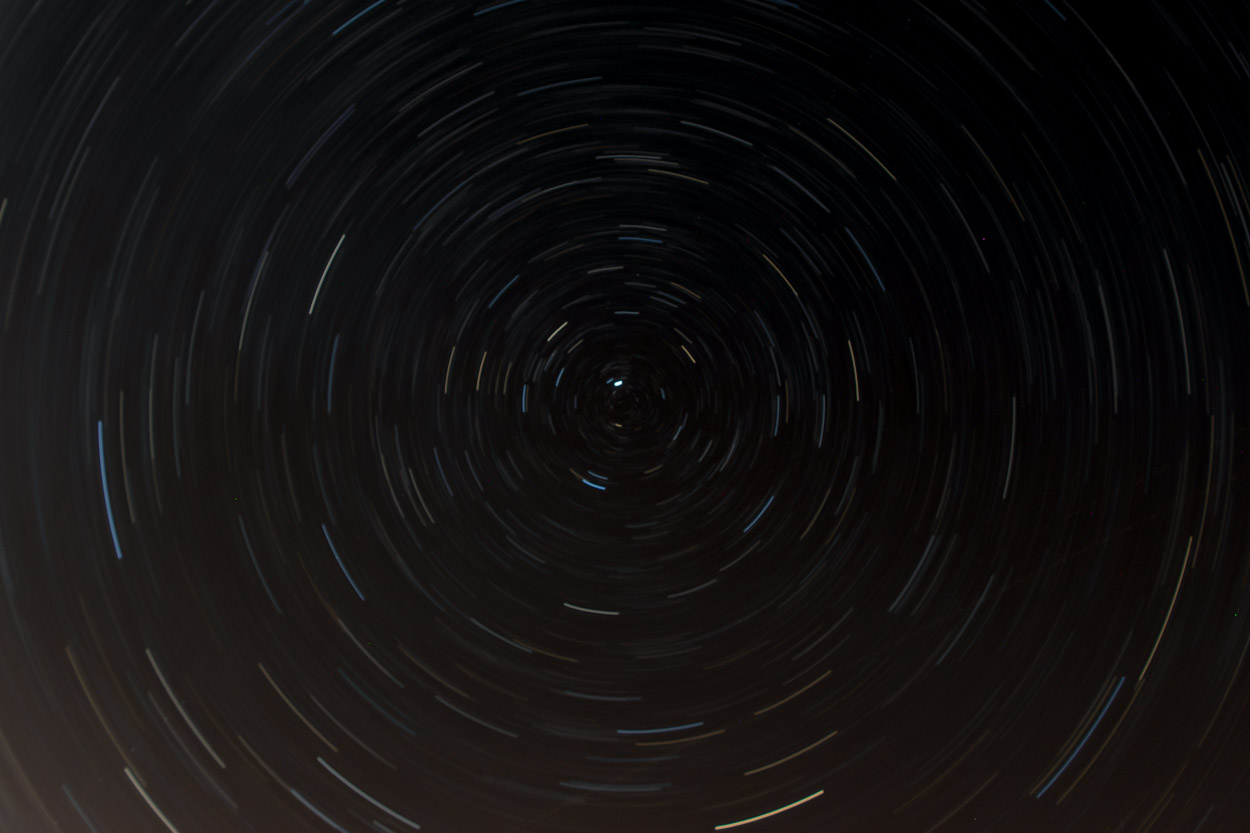
4. Starlight trails
Photographing starlight trails, or “star trails,” is a wonderful technique that requires a bit more planning, patience, and the right equipment. This technique allows you to capture the movement of stars across the sky, creating characteristic light trails. To achieve this, you need to follow a few key steps:
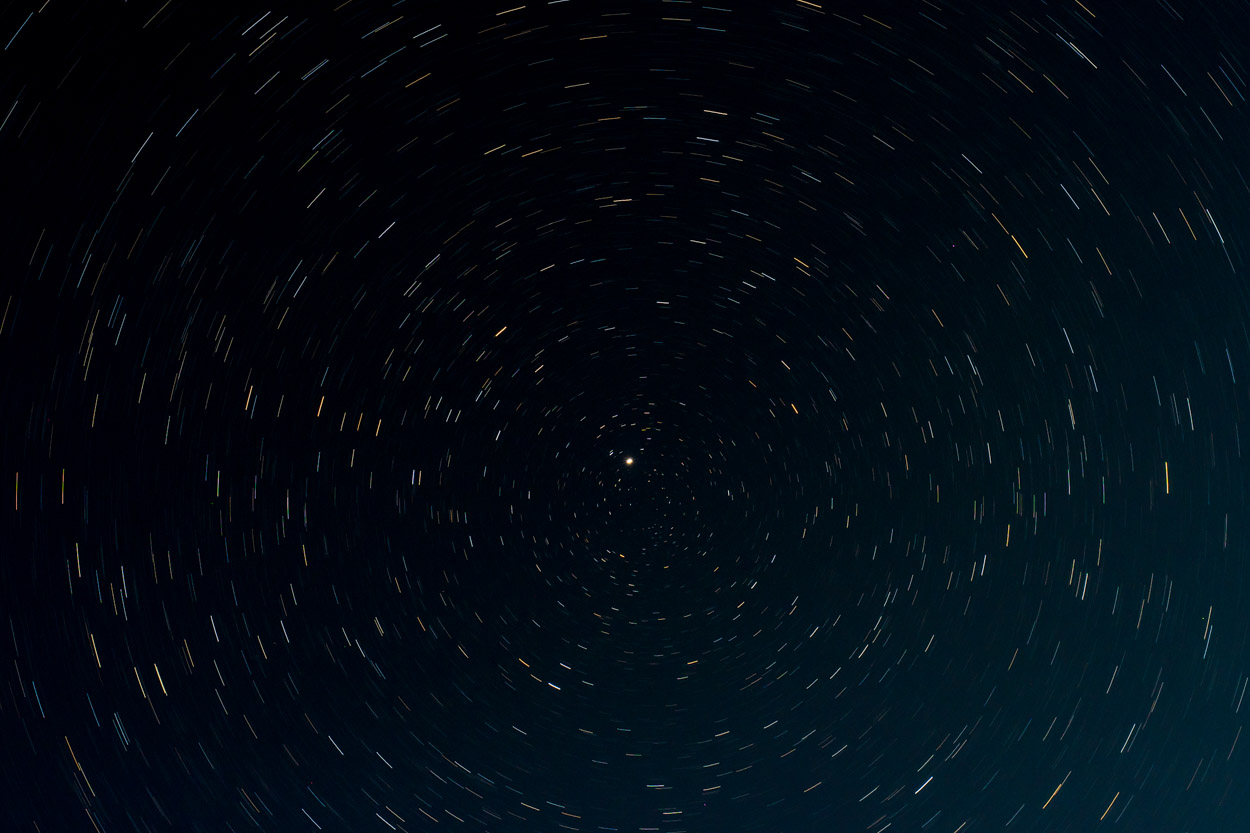
Location
Choose a location with minimal light pollution. Ideally, find a dark location away from city lights on a moonless night. Stars are most visible on clear, cloudless nights.
Equipment
To photograph starlight trails, you will need a sturdy tripod, a DSLR or mirrorless camera with a manual setting function (Manual Mode), and a remote trigger or intervalometer.
Camera settings
Set your camera to manual mode (M). Choose a wide-angle lens (e.g., 14mm–24mm) and set it to its maximum aperture (smallest f-number). The ISO should be between 100 and 400 to reduce noise, and the exposure time should be between 15 and 30 seconds. You will need to adjust the exposure length based on your location, light conditions, and desired effect. More than 30 minutes of exposure will typically create longer trails.
Focusing
Use manual focus. The easiest way to focus on stars is to set the focus to infinity (the ∞ symbol) and then fine-tune it to get the sharpest stars.
Composition
Choose the direction in which you want to shoot. If you want to capture circular trails, aim your lens at the North Star (or the Southern Cross in the southern hemisphere). If you want the trails to be more linear, aim your camera towards the east or west.
Shooting a series of photos
Use an intervalometer or remote trigger to shoot a series of photos with a constant exposure time. In principle, you can take a hundred or more photos.
Photo processing
Use photo editing software to adjust contrast, brightness, and other parameters and maximize the star trail effect. You can use Adobe Photoshop or StarStaX to merge multiple shots into one image. This will create the characteristic starlight trails.
Equipment Protection
Long exposures can lead to overheating of your camera’s sensor, so it’s good to let the camera “rest” a bit between shots. Also, be mindful of weather conditions, especially humidity and dew point, which could cause dew to form on the lens.
Remember, getting excellent photos of star trails will take some practice and patience. Don’t get discouraged if you don’t succeed right away, and always adapt to the current conditions and experiment with different settings.
– Bulb mode
The bulb mode, often marked “B” on camera shutter settings, is a mode that allows the photographer full control over the exposure time. In bulb mode, the shutter remains open as long as the trigger is pressed. This allows for photography in very dark conditions, for long exposures, or for special techniques such as light painting or star trail photography. Using bulb mode is ideal for night photography or long exposures, as it allows for an exposure of more than 30 seconds, which is often the longest possible setting on most digital cameras. In this mode, the shutter can remain open as long as necessary to gather enough light to produce a clear image.
Due to the long exposure time, it is recommended to use a sturdy tripod to prevent camera shake, which would cause blur. Using bulb mode usually also requires a remote trigger or intervalometer, which allows the photographer to keep the shutter open without having to hold the trigger themselves. This is particularly useful for very long exposures, as it prevents camera shake and allows the photographer to focus on other aspects of photography. Bulb mode is a powerful tool for any photographer wanting to explore and experiment with light and time.
5. Silhouettes
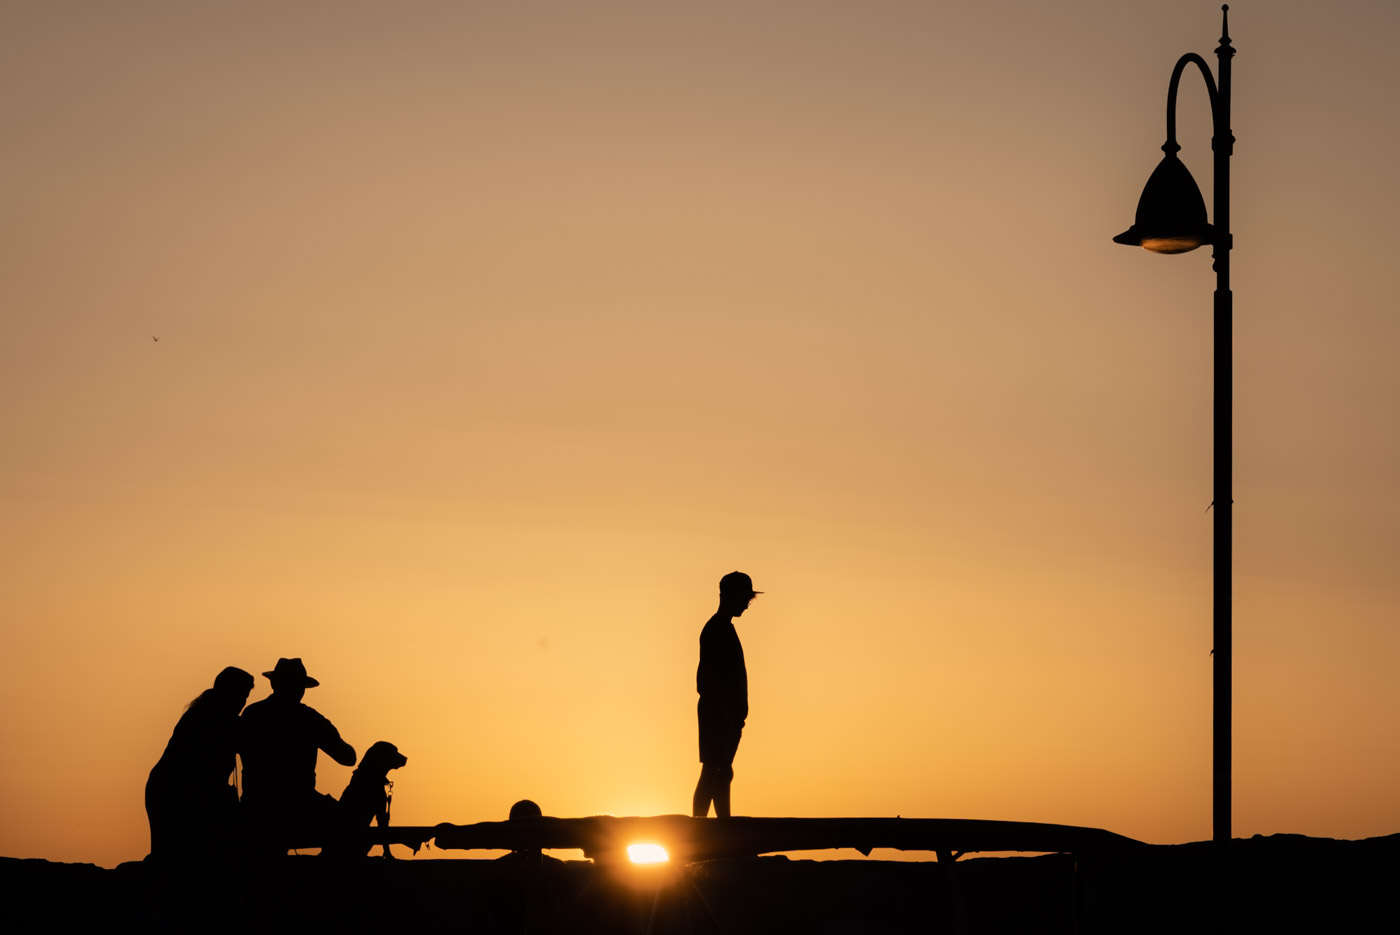
Photographing silhouettes is one of my favorite ways to shoot. Silhouettes in our photos create a strong visual contrast and stunning composition, which can completely transform a regular scene. Let’s see how to achieve this.
Shooting Time
The ideal time for photographing silhouettes is early in the morning or late in the afternoon, when the sun is low on the horizon. It’s important to have the light behind you, i.e., behind the subject you’re photographing.
Subject Selection
For a silhouette, it’s best to choose a subject that is recognizable in itself—a human figure, a tree, a building, or something similar.
Focusing
Focus on the light in the background, not on the subject. This way, your subject will be underexposed and will appear as a dark silhouette.
Composition
As silhouettes are simple and dark, composition is especially important. The rule of thirds is an excellent tool for setting up the scene.
Sharpness
For sharp silhouettes with clear edges, it’s best to use a smaller aperture (larger f-number), which will contribute to a greater depth of field.
Postproduction
In photo editing, you can further emphasize the contrast between the silhouette and the background. Use tools to increase contrast and decrease the brightness of the subject, making the silhouette even stronger.
Whether you’re photographing people, animals, or landscapes, creating silhouettes is a great way to add drama and depth to your photos. With a bit of practice and experimentation, you can create truly stunning images.
Conclusion: Mastering Photography Tips and Techniques
And there you have it! These are some photography tips and techniques that I personally love to use 😀. Each technique opens up a completely new perspective and adds a unique dynamic to my photographs. Whether it’s using natural light, the rule of thirds, depth of field, panning, bokeh, or creating dramatic silhouettes, each technique brings my visual stories to life.
So here’s my advice: don’t limit yourself to just one technique; experiment! Each time you set out to take photographs, try to use at least one new technique. May your next adventure be filled with light, contrasts, and, of course, unforgettable photographs. But don’t forget that the most important thing about photography is that you enjoy the process. Photography is an expression of your creativity and unique perspective. Happy shooting 📸!
Find me on social media and take a peek into my world of photography.